

Editor
This page gives access to the documentation of XML configuration file editor.This editor gives a way to upadte and/or view XML configuration file that are compliant with JEZXmlConfig DTD.
How to run the editor
Before running the editor, you must include following libraries in your CLASSPATH :
- JEZXmlConfig.jar
- JEZXmlConfigCtx.jar
- JEZXmlConfigEditor.jar
- An XML parser (Xerces for example)
java net.sourceforge.jezxmlconfig.gui.editor.ConfigEditor -? | -h | -help
|
Command line to run the editor
java net.sourceforge.jezxmlconfig.gui.editor.ConfigEditor [ -look ] [ file ]
|
look |
Could be CrossPlatform, System, Metal, Windows, CDE/Motif,
or a full qualified look&feel class (with absolute package path). Other look&feel could be available (GTK for example) depending on JRE and plateform. Use -? option for more information.Default look&feel is System. |
|
file |
A configuration file to edit (created if not already exist). If file is write protected, editor will launch in readonly mode. |
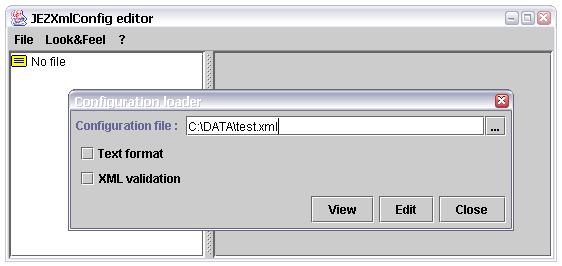
How to load a configuration file
The file selection dialog box (Option File->Open...) contains an option to activate DTD validation or not
(Checkbox "XML validation").
It is also possible to directly access to XML source checking option "Text format".
Then, user can choose between editing configuration (button [Edit]) or view it in read-only mode (button [View]).
The [close] button simply cancels configuration file loading.
After file load, sections are displayed in a hierarchical tree situated on the left of editor,
and parameters of selected section are automaticaly displayed on the right part.
Note : If you select the root node (which contains the file path), defined constants are displayed
exactly the same way than section parameters.
You can also access a configuration with JNDI (Option File->JNDI access...).
In this case, you must select one of listed JNDI names corresponding to
existing configurations into
JEZXmlConfig JNDI service provider:
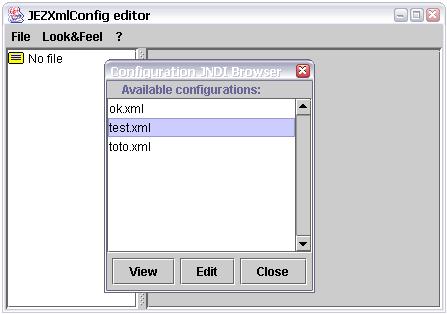
You can then edit the configuration loaded from JNDI.
Then, if you use the File->Save option, the configuration
will be updated in the JEZXmlConfig JNDI service provider repository.
How to update parameters
Parameters are always created within a section. Defined constants and parameters can be edited form the right part of the editor.
To display some parameters, you just have to select the parent section on the left part.

After modifications, [Apply] and [Restore] buttons become actives (they are located near the bottom right corner). The [Apply] button validates updates in configuration, while the [Restore] button reset parameters exactly they were before modifications. Of course, after [Apply] activation you cannot use [Restore] any more for these updates.
To update a parameter value you just have to make your change in the right part, then validate modification by activating the [Apply] button.
To add or delete a parameter, you must use [Delete all], [Delete] and [Insert] buttons.
You can change parameters order with  ,
,  ,
,  and
and  buttons.
When you want to insert a constant or system property reference in a parameter value, you can simply type it with
format ${key}, or use button  or
or  .
.
Set the text cursor at the location you want to insert a reference, and then press the button corresponding to the reference
(constant or system property).
This is very usefull because there are many existing system properties and we simply don't remind all.
How to change sections structure
When a section is selected on the hierarchical tree, a right clic on this section displays a popup menu that contains commands dedicated to section structure modification.
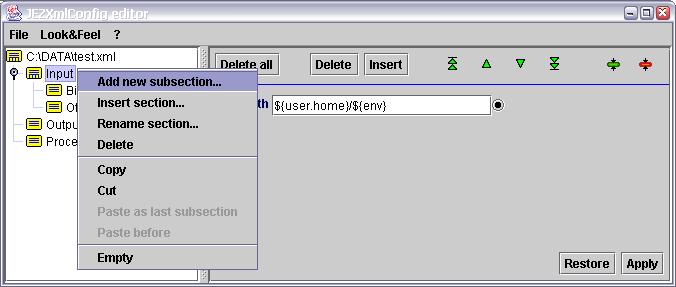
- Add new subsection...
- Add a new subsection as the last child of current selected section.
- Insert section...
- Insert a new section before the current selected one.
- Rename section...
- Rename the current selected section.
- Delete
- Delete the current selected section, including all subsections recursively. A confirmation dialog box will be displayed.
- Copy
- Copy the current selected section in clipboard, including all subsections recursively.
- Cut
- Delete the current selected section and put it in clipboard, including all subsections recursively.
Equivalent to a Copy followed by a Delete. - Paste as last subsection
- Paste the section present in clipboard as the last child of current selected section.
- Paste before
- Paste the section present in clipboard before the current selected section.
- Empty
- Delete all selected section content (subsections and parameters). A confirmation dialog box will be displayed.
 Version française